- 2 x 8in square feature fabric
- 9 in square piece of insul-bright batting
- approx 50 inches of binding fabric 2.5 inch wide
(instructions to join strips are below)
Method:
First cut out your feature fabric and lay it out with bottom one right-side down and the top one right side up. Sandwich the insul-bright in between taking care that the feature fabric pieces don't get too skewed in the process.
Then pin the sandwich together.
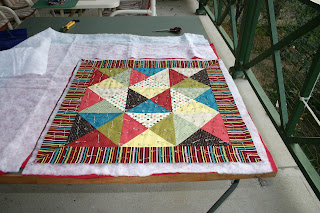
 Using a walking foot, quilt the sandwiched pieces together. You can use what ever pattern you like. I started with one diagonal stitch line and then followed with parallel lines.
 Once that is done, trim the excess insul-bright. I line up the top fabric with a horizontal marking on my ruler so I know Im keeping a right angle. Do this all 4 sides
 It starts to take shape.
 Now for the binding. Cut your 2.5 inch strips. I've cut 3 lengths from a fat quarter as pictured below, but 2 lengths were plenty.
 To join the strips, place one strip right side up horizontally on the mat, then the other strip right side down over laying the first strip. make sure theres a little extra on the right and bottom of the joins. Get a Ruler and mark a diagonal line across the square formed and pin it as shown.
 Sew down the line you drew. Continue until all your strips are connected in the same way.
Iron your long binding in half length ways, this makes it easier to pin and sew.
Pin the long binding strip to the sandwich, keeping the raw edges of the binding and the sandwich together. For ease of finishing, I line up and pin the first edge but only start sewing about an inch from the bottom. Finish your stitches 1/4 inch from the edge. (Its better to over sew that, than under)
Take the binding and at the corner, fold up at a 45 degree angle as shown below
 then fold directly down to meet the side of the sandwich, as shown below, and pin.
Continue to pin the rest of the edge down and sew. Remember to start 1/4 inch from the top and finish 1/4 inch from the bottom.
 When you've done this all the way around 3 sides. Come to the final side - and open up both ends of the binding. Lay them out as shown.
 Make a make somewhere in the middle - I have marked the top layer at the number 3.
 Then mark the bottom layer 1/2 inch more than the top one, so they over lap. See my mark here at 2.5 inch line.
Check it. Double Check it and Triple check that the bindings will overlap at those two points and there is not a gap.
Mark a 45 degree angle from both those marks in the same direction (ie \ and \ not / and \ )
 Then cut along the 45 degree marked lines.
 Take the two cut edges and work them together right sides together and pin
 Sew a 1/4 inch seam down that edge so it joins the two ends of the binding together.
 the binding will now be joined and lay flat. Pin this side to the sandwich and sew along the whole edge. Starting 1/4 inch from the top and finishing 1/4 inch from the bottom.
Turn the binding out and start to pin the folded edge of the binding to the under side of the sandwich. Hand hem the binding with small invisible stitches.
Take the binding and at the corner, fold up at a 45 degree angle as shown below
 then fold directly down to meet the side of the sandwich, as shown below, and pin.
Continue to pin the rest of the edge down and sew. Remember to start 1/4 inch from the top and finish 1/4 inch from the bottom.
 When you've done this all the way around 3 sides. Come to the final side - and open up both ends of the binding. Lay them out as shown.
 Make a make somewhere in the middle - I have marked the top layer at the number 3.
 Then mark the bottom layer 1/2 inch more than the top one, so they over lap. See my mark here at 2.5 inch line.
Check it. Double Check it and Triple check that the bindings will overlap at those two points and there is not a gap.
Mark a 45 degree angle from both those marks in the same direction (ie \ and \ not / and \ )
 Then cut along the 45 degree marked lines.
 Take the two cut edges and work them together right sides together and pin
 Sew a 1/4 inch seam down that edge so it joins the two ends of the binding together.
 the binding will now be joined and lay flat. Pin this side to the sandwich and sew along the whole edge. Starting 1/4 inch from the top and finishing 1/4 inch from the bottom.
Turn the binding out and start to pin the folded edge of the binding to the under side of the sandwich.
 Hand hem the binding with small invisible stitches.


 and matching detailed tea towel - I'll post more on those later

 I got the parallel diagonals by using the guide that came with the walking foot. Just by chance, the distance between each diagonal perfectly matched the check in the fabric....you couldnt plan that if you tried.
 and there with the binding machine sewn on - all ready and waiting for the hand stitching. I think its still waiting.
 After machine quilting:
 Some details:

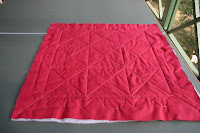 And the finished quilt:


 And then machine quilt. I used Mum's Bernina Aurora machine to quilt and it was a blast. She showed me some fabulous tips like:-
 I was very happy with the end result, and I hope little Haley loves it too. I still need to label it.


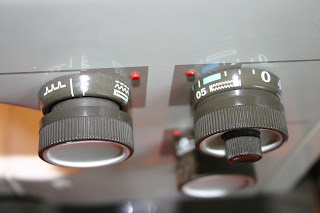 Model number:
