I thought about this quilting style for the Hoppe baby-in-waiting quilt
Saturday, October 10, 2009
More scrappy inspiration...
I think I might do something like this but smaller as a wall hanging to go along with the Hoppe baby-in-waiting quilt

Long time no sew
Gosh its been a long time since I last had my sewing machine out - but with the unseasonal cold snap, its perfect weather to be hiding indoors with fabric and the machine.
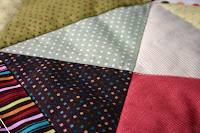
I was completely inspired by this wonky quilt, I decided to make one for my very good friend's baby-in-waiting.
I think its meant to be a bit of a scrappy quilt to use up bright and coloured odds and ends - I used some of my stash, but needed to grab a few other bits and pieces where my stash fell short eg. yellows and oranges.
Here's the inprogress shots.


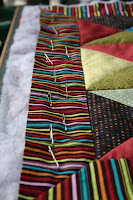
I have to say I definately underestimated how difficult it would be for me to deliberately make those "squares" wonky. The first one I did was perfectly square, and I had to unpick it. ;)
Even harder was to attach them all together to make them sit wonkily.
Im very please with how this has turned out - now I just need to decide on backing and binding. Or do you think it needs something around the outside as a border?
Monday, May 25, 2009
Unemployment blues....and greens
As "my" colours are blue and green, Ive been collecting fabrics in that range for quite sometime without really knowing what to do with them.
 Then, as I was browsing through many, many internet quilting blogs and getting inspiration, I came across a quilt that inspired my creativity. I loved the mismatched-ness and boldness of the colour and fabrics. It is made up of the disappearing nine patch pattern (tutorial that I used can be found here)
So here's the cut disappearing nine patches ready to sew into rows.
 Im not sure yet exactly what Im making, it will be a quilt of sorts, but still unsure of size etc. Id really like to stipple this but I think I'll need some serious practice first.
Sunday, February 15, 2009
Pot Holder tutorial
You will need:
- 2 x 8in square feature fabric
- 9 in square piece of insul-bright batting
- approx 50 inches of binding fabric 2.5 inch wide
(instructions to join strips are below)
Method:
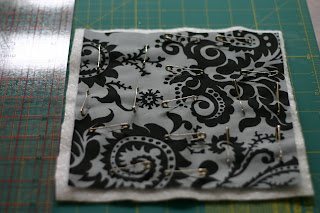
First cut out your feature fabric and lay it out with bottom one right-side down and the top one right side up. Sandwich the insul-bright in between taking care that the feature fabric pieces don't get too skewed in the process.
Then pin the sandwich together.
 Using a walking foot, quilt the sandwiched pieces together. You can use what ever pattern you like. I started with one diagonal stitch line and then followed with parallel lines.
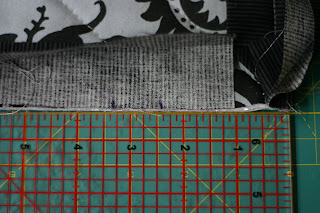
 Once that is done, trim the excess insul-bright. I line up the top fabric with a horizontal marking on my ruler so I know Im keeping a right angle. Do this all 4 sides
 It starts to take shape.
 Now for the binding. Cut your 2.5 inch strips. I've cut 3 lengths from a fat quarter as pictured below, but 2 lengths were plenty.
 To join the strips, place one strip right side up horizontally on the mat, then the other strip right side down over laying the first strip. make sure theres a little extra on the right and bottom of the joins. Get a Ruler and mark a diagonal line across the square formed and pin it as shown.
 Sew down the line you drew. Continue until all your strips are connected in the same way.
- 2 x 8in square feature fabric
- 9 in square piece of insul-bright batting
- approx 50 inches of binding fabric 2.5 inch wide
(instructions to join strips are below)
Method:
First cut out your feature fabric and lay it out with bottom one right-side down and the top one right side up. Sandwich the insul-bright in between taking care that the feature fabric pieces don't get too skewed in the process.
Then pin the sandwich together.
 Using a walking foot, quilt the sandwiched pieces together. You can use what ever pattern you like. I started with one diagonal stitch line and then followed with parallel lines.
 Once that is done, trim the excess insul-bright. I line up the top fabric with a horizontal marking on my ruler so I know Im keeping a right angle. Do this all 4 sides
 It starts to take shape.
 Now for the binding. Cut your 2.5 inch strips. I've cut 3 lengths from a fat quarter as pictured below, but 2 lengths were plenty.
 To join the strips, place one strip right side up horizontally on the mat, then the other strip right side down over laying the first strip. make sure theres a little extra on the right and bottom of the joins. Get a Ruler and mark a diagonal line across the square formed and pin it as shown.
 Sew down the line you drew. Continue until all your strips are connected in the same way.
Iron your long binding in half length ways, this makes it easier to pin and sew.
Pin the long binding strip to the sandwich, keeping the raw edges of the binding and the sandwich together. For ease of finishing, I line up and pin the first edge but only start sewing about an inch from the bottom. Finish your stitches 1/4 inch from the edge. (Its better to over sew that, than under)
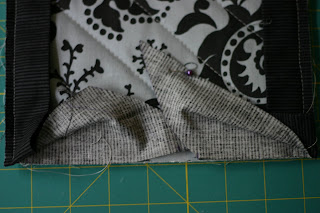
Take the binding and at the corner, fold up at a 45 degree angle as shown below
 then fold directly down to meet the side of the sandwich, as shown below, and pin.
Continue to pin the rest of the edge down and sew. Remember to start 1/4 inch from the top and finish 1/4 inch from the bottom.
 When you've done this all the way around 3 sides. Come to the final side - and open up both ends of the binding. Lay them out as shown.
 Make a make somewhere in the middle - I have marked the top layer at the number 3.
 Then mark the bottom layer 1/2 inch more than the top one, so they over lap. See my mark here at 2.5 inch line.
Check it. Double Check it and Triple check that the bindings will overlap at those two points and there is not a gap.
Mark a 45 degree angle from both those marks in the same direction (ie \ and \ not / and \ )
 Then cut along the 45 degree marked lines.
 Take the two cut edges and work them together right sides together and pin
 Sew a 1/4 inch seam down that edge so it joins the two ends of the binding together.
 the binding will now be joined and lay flat. Pin this side to the sandwich and sew along the whole edge. Starting 1/4 inch from the top and finishing 1/4 inch from the bottom.
Turn the binding out and start to pin the folded edge of the binding to the under side of the sandwich. Hand hem the binding with small invisible stitches.
Take the binding and at the corner, fold up at a 45 degree angle as shown below
 then fold directly down to meet the side of the sandwich, as shown below, and pin.
Continue to pin the rest of the edge down and sew. Remember to start 1/4 inch from the top and finish 1/4 inch from the bottom.
 When you've done this all the way around 3 sides. Come to the final side - and open up both ends of the binding. Lay them out as shown.
 Make a make somewhere in the middle - I have marked the top layer at the number 3.
 Then mark the bottom layer 1/2 inch more than the top one, so they over lap. See my mark here at 2.5 inch line.
Check it. Double Check it and Triple check that the bindings will overlap at those two points and there is not a gap.
Mark a 45 degree angle from both those marks in the same direction (ie \ and \ not / and \ )
 Then cut along the 45 degree marked lines.
 Take the two cut edges and work them together right sides together and pin
 Sew a 1/4 inch seam down that edge so it joins the two ends of the binding together.
 the binding will now be joined and lay flat. Pin this side to the sandwich and sew along the whole edge. Starting 1/4 inch from the top and finishing 1/4 inch from the bottom.
Turn the binding out and start to pin the folded edge of the binding to the under side of the sandwich.
 Hand hem the binding with small invisible stitches.


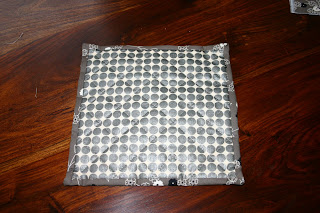
Pot Holders
Some of the other pot holders Ive made.

 and matching detailed tea towel - I'll post more on those later


 and matching detailed tea towel - I'll post more on those later
First use of the new walking foot
Pot Holder
 Notice the scarily accurate eye-balled diagonals
 I got the parallel diagonals by using the guide that came with the walking foot. Just by chance, the distance between each diagonal perfectly matched the check in the fabric....you couldnt plan that if you tried.
 and there with the binding machine sewn on - all ready and waiting for the hand stitching. I think its still waiting.
My very first go at machine quilting on my own machine with the fantastic walking foot we found from Chatswood Sewing Centre.
The pot holders are made by sandwhiching insulated batting called "Insul-bright".
 Notice the scarily accurate eye-balled diagonalsI got the parallel diagonals by using the guide that came with the walking foot. Just by chance, the distance between each diagonal perfectly matched the check in the fabric....you couldnt plan that if you tried.and there with the binding machine sewn on - all ready and waiting for the hand stitching. I think its still waiting.
I'll post some others I've since finished in another post.
Saturday, February 14, 2009
James' Quilt
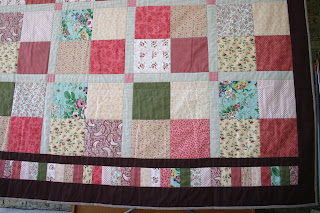
Another back posting - this is on the first quilt I finished and I made it for a friends baby.I wasnt sure of the sex baby yet, and knowing my friend's taste, I wanted to create a gorgeous baby quilt in classy pastels of cream and green and yellow.
 Mum and I spent hours looking at the layout trying to find patterns that shouldnt be there. Im sure we changed things at least a dozen times and it was sitting like this for a couple of days
 After machine quilting:
 Some details:
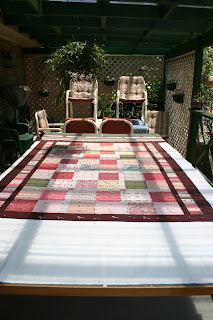
 And the finished quilt:


It somehow evolved to an extremely bright and colourful fabric collection - but I loved it.
The planning process:
 Mum and I spent hours looking at the layout trying to find patterns that shouldnt be there. Im sure we changed things at least a dozen times and it was sitting like this for a couple of days
For the record, the placing of the white background spot was deliberate.
The pinning:
The pinning:
After machine quilting: Some details: And the finished quilt:Haley's Quilt
This is a bit of a back posting, as all started almost a year ago when my niece Haley was born. Our family was all extremely excited by her arrival and that we finally found out it was a girl.


 And then machine quilt. I used Mum's Bernina Aurora machine to quilt and it was a blast. She showed me some fabulous tips like:-

 I was very happy with the end result, and I hope little Haley loves it too. I still need to label it.
My head (along with everybody elses) went into Pink over drive and I decided I wanted to make her a quilt. Id never made a quilt before.... but what a better inspiration, than a newborn niece??
Id had in my mind a simple design quilt with pinks, greens and chocolatey browns - to match their dark grain cot. So I set about cutting and piecing 4 x 9inch (I think) squares into patches and tramming with a tea coloured check. (I didnt take photos of the piecing process)
I had finished the majority of the top of the quilt one trip home and then planned the two side borders to make the quilt wider. And I purchased the backing and border fabrics.
For the next trip home to Sydney, I had finalised the quilt top and went to buy batting. I found this GORGEOUS all cotton batting on sale in Spotlight - I'll have to remember what its called.
So the next step was to pin it all together....and here's where I have some pics.
And then machine quilt. I used Mum's Bernina Aurora machine to quilt and it was a blast. She showed me some fabulous tips like:-- anchoring the thread by making small small stiches at approx 0.6 length
- bring the bobbin thread up to the top of the quilt before you start stitching
It was all "in the ditch" quilting and to see it all come together and start to look like a finished project was fabulous.
It was all "in the ditch" quilting and to see it all come together and start to look like a finished project was fabulous.
After machine quilting was complete, I decided to bind it in the backing fabric, a coffee coloured gingham, and then the hand stitching.
Finished quilt...
I was very happy with the end result, and I hope little Haley loves it too. I still need to label it.Even though this was the first quilt I started, it was actually the second one I finished.
Tools of the trade
For the purposes of cataloging, here is my sewing machine...

With attached walking foot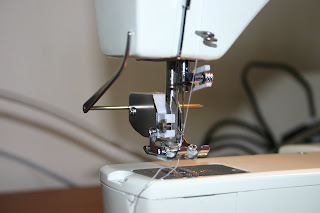 side view
 side view
Controls:
 Model number:
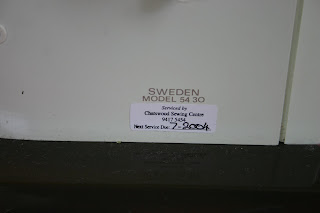
Subscribe to:
Posts (Atom)